How to: log a trip manually on the website
In this guide, we will show you how to add a trip on the website.
In this article
- Create a manual trip on the Driversnote website
- Create a return trip on the website
- Create a multi-stop trip on the website
- How to customise a route
- Common questions
Note: Manual trips cannot be created for dates more than 2 years ago. Read about our new trip archiving function that will help to improve app functionality and stability.
Create a manual trip on the Driversnote website
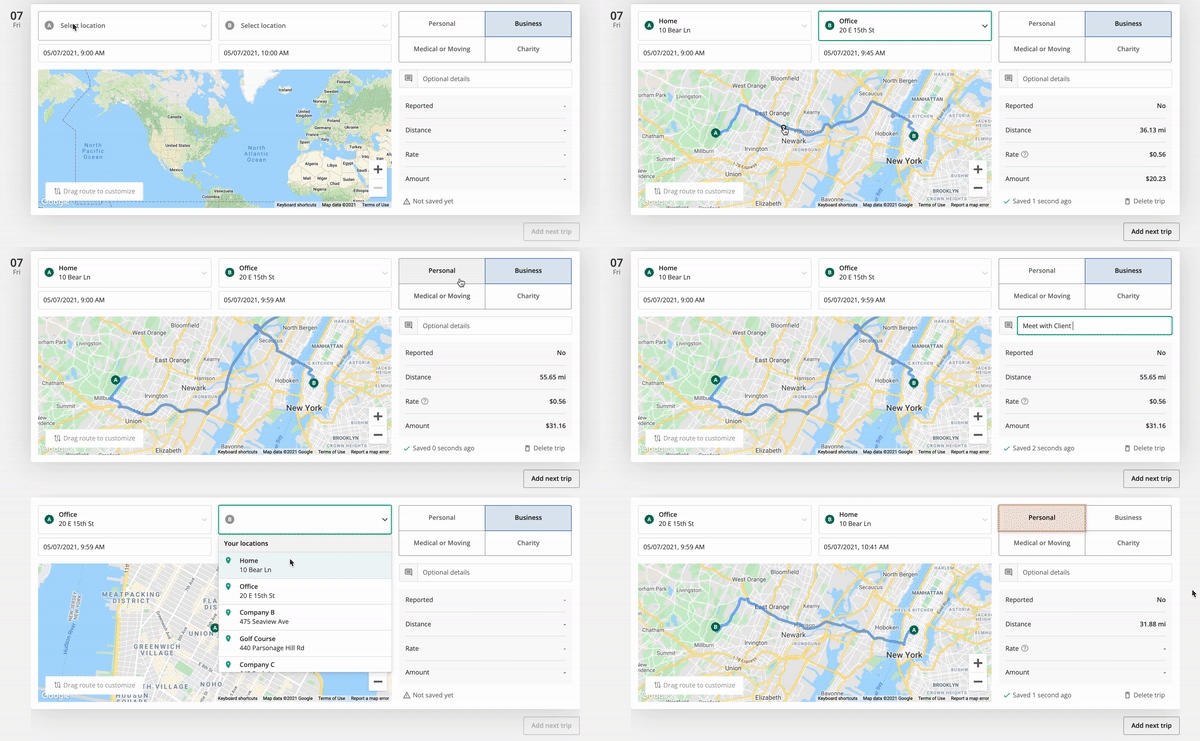
You can create a trip manually from our website dashboard on your computer with the steps below. On the web, you have the option to “draw” the route as well.
- Sign in to your account at Driversnote
- Click Trips then a. Scroll down to the date you wish to add a trip and click Add trip. OR, click Add trip in the top right-hand corner and select the date from the pop-up calendar
- Type in your Start (A) and End (B) locations
- If the route shown on the map is correct, proceed to step 5. You can drag the route to match the route have you driven.
- Classify your trip as Business or Personal/Private (Additional options for US users: Medical or Charity)
- You can also make a note and record specific details about your trips to support your claims
- Edit the time of your trip on the calendar by clicking on the start location (A) and changing the start time. We will automatically calculate the end time.
- The trip will save automatically
- If you need to add another trip from the same date, click Add next trip

Create a return trip on the website
You can easily create a return trip manually on the website.
- Under Trips, scroll to the date you wish to add a return trip
- Under the latest trip, there is a Add Trip sign
- We will pre-fill the start location (A) with the end location of the previous trip
- Enter your stop location (B)
- We will show you the fastest suggested route. If you have taken another route, you can drag the blue line to match the route driven.
- Review and classify
- The trip saves automatically
Create a multi-stop trip on the website
If you have made one trip with multiple stops, you will need to log each “leg” of the trip separately. Add a relevant note to each trip (to show that it was all the same trip).
Tip
To have all of your drives automatically logged for you, check our iBeacon!
How to edit the route
If you have created a trip manually and would like to edit it later, you can do this. Find the trip and open it again. In the map area, click on Reset Route. It will now allow you to drag the correct route between the Start (A) and End (B) locations. The trip will save automatically.
Please note that you can only do this on manually created trips. If you have a GPS-tracked trip, you will be unable to edit the route. However, you can create a new manual trip using the start and end locations and then drag and select the correct route. Delete the GPS-tracked trip afterward.

Common questions
Q: How do I delete a trip?
To delete a saved trip from the mobile app, select the trip you wish to delete, then tap on the garbage bin icon in the top right corner. To delete a trip via the Driversnote website, scroll until you find the trip and to the right side of the trip, there are some quick actions. Click on the garbage can icon to delete the trip.
Tip
Once there are trips logged on a vehicle, you cannot delete the vehicle until all trips logged on it are also deleted. Instead, you can archive the vehicle.
Q: How and why is my reimbursement calculated for each trip?
Each trip classification has a corresponding reimbursement rate. You are entitled to more per mile/km for business than for charity, for example. We automatically calculate reimbursement rates for you based on your local tax authority’s most recent data. However, if you would like to create a custom rate or have no rate check out our guide: manage reimbursement and mileage rates.
Q: How do I edit a trip?
On the app, go to the Trips section. Find and tap on the trip you wish to edit.
On the web, we have quick actions. You can scroll down the trip list and as you hover over each trip, you can classify the trip, or delete it (trashcan icon). If you need to add more details, for example, a note, click on the trip to open up its details.
For more information on classifying trips, check out our guide: How to classify trips
